


Yeast - General Info
Yeast-Reuse & Pitching
Yeast-Reference
Yeast-Videos

White Labs Pitchable Yeast is packaged with 70 to 140 billion yeast cells, which corresponds approximately to a 1-2 liter size starter. Lag times are typically between 12-24 hours for a normal strength brew.
A yeast starter is used to initiate cell activity or increase the cell count before using it to make your beer. The yeast will grow in this smaller volume, usually for 1-2 days, which then can be added to 5 gallons of wort.
While a starter is not always necessary, White Labs recommends making a starter if the Original Gravity is over 1.060, if the yeast is past its "Best Before" date, if you are pitching lager yeast at temperatures below 65F, or if a faster start is desired.
Procedure:
In a medium sauce pan, add 2 pints of water and 1/2 cup Dried Malt Extract (DME). Mix well and boil the solution for about 10 minutes to sterilize. Cover and cool the pan to room temperature in an ice bath. This will give you a wort of approximately 1.040 OG. Keeping the Original Gravity low is important because you want to keep the yeast in its growth phase, rather than its fermentation phase. The fermentation phase will create alcohol which can be toxic to yeast in high concentrations.
Pour the wort into a sanitized glass container (flask, growler, etc.) and pitch the vial of yeast. Cover the top of the container with a sanitized piece of aluminum foil so that it is flush with the container, but will still allow CO2 to escape. Vigorously shake or swirl the container to get as much oxygen dissolved in the solution as possible. Keep the starter at room temperature for 12-18 hours on a magnetic stir plate, or occasionally shaking it to keep the solution aerated.
You probably won’t see any visible activity, but the yeast is busy taking up the oxygen and sugars in the solution and growing new cells. After 18 hours, the yeast will have consumed all of the nutrients and oxygen in the starter. Switch off the stir plate or discontinue shaking and it will form a milky white layer on the bottom of the container as the yeast flocculates. If you are not planning on pitching the yeast right away, you can store it in the refrigerator with the foil still in place.
When you are ready to brew, decant off most (80%) of the clear liquid from the top, being careful not to disturb the yeast layer below. Once the yeast and your wort are at approximately the same temperature, rouse the starter yeast into suspension with the remaining malt solution and pitch the yeast slurry into your wort.
Typical Starter Volumes for 5 gallons:
To activate the yeast: 1 pint (with 1/4 cup DME)
To revitalize yeast past its Best Before Date: 2 pints (with 1/2 cup DME)
To brew a high gravity beer: 2 pints (with 1/2 cup DME)
To brew a lager beer, starting fermentation 50-55F: 4 pints (with 1 cup DME)
What is a Yeast Starter?
A yeast starter is essentially a mini batch of beer. The difference is that whereas you brew a batch of beer to have a tasty beverage, you make a yeast starter to make more yeast. So while you need to take into account flavor and aroma when brewing, the only thing you need to focus on with a starter is growing healthy yeast.
You make a yeast starter in order to:
Grow enough healthy yeast to properly ferment your beer. Pitching a larger amount of yeast will ensure a quick and complete fermentation, prevent off-flavors, and lead to all around better tasting beer.
Prepare the yeast for fermentation. Yeast that have been sitting in the refrigerator for months are dormant. A starter will activate the yeast and get them ready to start fermenting beer.
A starter is a way to proof your yeast. If you have yeast that has been sitting around for a long time, you want to make sure it is still viable. If it is completely dead, you’d rather find out in a starter than in a 5 gallon batch of beer.
What Yeast to Use?Starters should only be made for liquid yeast cultures. Dried yeast packs already contain enough cells (220-230 billion) to inoculate a 5 gallon batch, so it is not necessary to grow them. Simply rehydrate the dry yeast according the the manufacturer’s instructions.
The most common liquid yeasts are the Wyeast Activator Smack Pack and the White Labs vials. Each of these contain roughly 100 billion cells, but you’ll want about 200 billion for a typical 5 gallon batch of ale. The starter will get you there.
Starter SizeThe size of the starter depends on the beer that you’re making. Higher gravity beers and lagers require bigger starters. Check out my post where I go into more depth about the proper yeast starter size where I give a video walk-through of the Mr. Malty pitching rate calculator.
If you’re brewing a beer with a high starting gravity (1.065+), a lager, or have old yeast, then I suggest you use the calculator to figure out the correct size. For a standard gravity ale, you’re safe with a 1 liter starter.
Wort Size
The size of the starter refers to the amount of wort (water + DME) in the container after the wort is boiled and cooled. This means that you should put slightly more water into the pot than you want to end up with because a portion will boil off. You are only boiling for 15 minutes, so it won’t be much. I add 100-200 ml extra to a 1 liter starter and it ends up very close. Experience is key here, but it doesn’t need to be perfect.
Amount of DME to Use
The starting gravity of the starter wort should be between 1.030-1.040. There is a very simple metric ratio you can use that will get you there: 1 gram DME for every 10 ml wort (after boiling). So using the 10 to 1 ratio, a 1 liter starter requires 100 grams of DME.
Dried Malt Extract Weight to Volume Conversions
You might not have a scale, which makes weighing the DME pretty tough. While measuring DME in weight is always better than measuring in volume, if all you have is standard measuring cups then you can use the conversions I’ve measured out for you. Keep in mind these were taken with the cup filled to the brim and after tapping the side to fit more DME. It’s not perfect, but will get you close enough.
1/4 cup = 33 grams
1/2 cup = 66 grams
3/4 cup = 99 grams
1 cup = 132 grams
So for example: If you are making a 1 liter starter and using the recommended ratio of 1 g DME to 10 ml, then you would need 100 grams. Working with cups, you would add 3/4 cups.
Equipment needed
Saucepan or pot. At least twice the size of the starter liquid volume is ideal because you are going to get significant foaming, just like in brewing beer.
Large glass container for making the starter. I use an 2 liter Erlenmeyer flask, but you could also use a growler or large mason jar. Clear is better because you can see the starter activity. The size depends on what size starter you are making, but 2 liters (~ 1/2 gallon) will do for most of your starters.
Liquid yeast, either White Labs or Wyeast.
Light Dried Malt Extract (DME).
Egg whisk.
Scale for weighing DME.
Thermometer.
Sanitizer (I use Star-San).
Ice.
Aluminum foil, cut into a square that will cover the top of your starter container.
Steps
Measure out your DME and place it aside.
Measure out your water and pour it into the pot; turn the burner on high.
When the water starts to boil, dump in the DME and stir vigorously with the whisk in order to break up clumps. Boil for 15 minutes
While the wort is boiling, prepare your sanitizing solution and sanitize your pot lid, thermometer, funnel, yeast package, aluminum foil, and starter vessel.
Near the end of the boil, prepare an ice bath in your sink to cool the wort.
After 15 minutes of boiling, remove the pot from the stove, place it in the ice bath, and cover with the lid.
Check the wort temperature with your thermometer. When it reaches 70-75 F, remove it from the ice bath. Cooling will take about 10 minutes.
Pour the wort into the starter vessel using the funnel and cover loosely with foil.
Add the yeast and swirl vigorously for 30 seconds, being careful not to spill.
Place the starter somewhere where it won’t be knocked over. It doesn’t need to be protected from light the way a batch of beer does.
Add oxygen. You can do this using a stir plate or just give it a shake as often as possible for those first 24 hours.
After 18-36 hours your starter will be done fermenting. You can either pitch it at this point into a fresh batch of beer, or if you are not yet ready to brew you can put it in the fridge until brew day. If this is the case, see the additional steps. Otherwise, you’re done!
Additional steps if you are storing the starter in the refrigerator until brew day:
Store the starter in the refrigerator to let the yeast settle out of the wort and form a layer on the bottom.
On brew day, take the starter out of the refrigerator and decant (pour off) the wort down the drain, while being careful to leave behind the yeast cake. Leave about a 1/2 inch of wort in the vessel so you can stir up the yeast. Give it a swirl and set aside. Let the starter come up to room temperature before pitching. Taking it out of the refrigerator 3-5 hours before you pitch is a safe bet.
When your cooled wort is in the fermentor and you are ready to pitch your yeast, give the starter one final swirl and pitch it into the wort. You are done!
Important Notes and Common Questions
Sanitation is key to the whole process. If you screw this one up, not only will you infect your starter, but you’ll infect and ruin the batch of beer that you pour it into. Be very, very, careful.
Hops do not need to be added to the starter. Remember we are making yeast, not beer. Some people add hops, but in my opinion it is an unnecessary step.
“Do I pour in the whole starter or decant?” A very good question. It really depends. If you are using a large starter ( 2L+) or are making a lighter beer where the starter could affect the flavor, then I recommend you decant. If you are making an 8% stout then you won’t notice the extra wort mixed in with the complexity of other flavors. If you do choose to decant, make sure you chill the starter to get the yeast out of suspension. Otherwise, you will pour yeast down the drain with the wort.
You don’t need a stir-plate to make a starter, but they are a good idea. What you do need however, is oxygen. Simply shaking the starter vessel every couple hours will get you results that are almost as good as the stir-plate.
Do not use an airlock. You want oxygen exchange between the liquid and air so all that is needed is loose fitting aluminum foil. This will allow oxygen to enter the vessel, but keep bugs out.
It is a good idea to add yeast nutrient to the starter to help promote yeast growth, however, I usually fail to follow my own advice on this one. There are minerals in the DME that will provide yeast nutrients. Additional nutrients do help, but they are not necessary.
“How long will my starter last?” The sooner you use your starter the better. The longer you wait, the more yeast cells die off and the starter becomes less effective. Try to use it within a week. If you wait longer, you should use that yeast to make another starter.
Additional Resources
Mr. Malty – Great resource developed by Jamil Zainasheff. Most of my information came from Jamil.
Yeast Starter Kit – Includes 2L Erlenmeyer flask, DME, and yeast nutrient from MoreBeer.com. This is a great kit for making your first starter.
How to wash your yeast
In professional brewing, a count of 3 million cells per ml for every 4 °Plato is a standard for an ale yeast, while a bottom fermenting yeast would require twice as much.
In my experience, pitching 1 liter of actively fermenting and highly viable starter provides a count of about 5 million cells per ml, which is considered acceptable for homebrewing purposes, leading to a lag time of less than 6 hours. For a high gravity ale or a lager, you need 2 liters of starter.
If you own a microscope and a hemacytometer, you can perform an accurate cell count, but this is not strictly necessary.
When you acquire a new yeast strain in a Wyeast pack, you will pitch about 50 ml of active culture in a flask with 250 ml of sterile wort.
In other situations however, a few more steps are required.
From master culture or slant - If you are starting from a master stored in distilled water, I suggest you first plate it, then use solid to liquid sterile transfer. Or you can skip the plating and use liquid to liquid sterile transfer.
If you are starting directly from a plate or slant, use solid to liquid sterile transfer.
In either case you will end up inoculating a culture tube containing 10 ml of sterile wort.
Incubate this tube in a warm (>27 °C) dry clean place. Expect signs of fermentation within 12 hours. Periodically crack the cap open and swirl to release CO2.
First step
As soon as fermentation begins, you should transfer the content of the tube to a small bottle or Erlenmayer flask containing 50 ml of sterile wort. This larger container should have a screw cap, rubber closure, or glass cap.
Prepare the flask using the wort to flask sterile transfer technique.
The flask now contains about 50 ml of sterile wort.
Now you can transfer the content of the culture tube into the flask, using liquid to liquid sterile transfer.
Incubate the flask in a warm (>27 °C)dry clean place. Expect signs of fermentation in a few hours. Periodically crack the cap open to release CO2.
Second step
As soon as fermentation begins, you should transfer to a larger flask (500 ml) containing 250 ml of sterile wort.
To prepare this larger flask, again use the wort to flask sterile transfer technique.
Then transfer the contents of the 50 ml flask to the 500 ml flask using liquid to liquid sterile transfer.
Having now a flask with approximately 300 ml of fermenting starter, you proceed with the final step as explained later.
From a Wyeast packSmack the pack as usual and incubate in a warm environment. When the pack swells to about 3 cm thickness, but before it becomes a balloon, you should draw a sample for selection and storage, and pitch the rest in your starter.
The usual precautions apply: scrub the table surface, test tube, Wyeast pack, scissors and your hands with alcohol. Wear a mask, keep your work area as dust-free as you can, work in flame zone.
Following the wort to flask sterile transfer technique, prepare a 500 ml flask containing 250 ml of sterile wort.
Next, have everything ready on the table: test tube with liquid media (sterile wort) standing in its rack, syringe, scissors, a sterile 500 ml flask with cap, containing 250 ml sterile wort.
When ready, proceed as follows:
- Since you can't flame the pack (try it :-), thoroughly scrub it with alcohol
- Take the syringe out of its package, hold it in right hand and briefly flame tip of needle
- Perforate the pack and draw about 1 ml of yeast suspension
- Keep the needle in the flame zone
- Take test tube with left hand
- Grab tube cap with right hand little finger, unscrew by turning tube with left hand. Hold cap between the little finger and the palm of your right hand
- Flame tube mouth
- Inoculate content of syringe into tube
- Flame the tube mouth again and place cap back on, again using left hand to screw it
- Discard syringe
- Hold scissors in right hand and flame blades
- Hold pack in left hand
- Cut a corner of the pack, and keep opening in flame zone. Put scissors away
- Hold flask in right hand
- Remove flask cap with left hand little finger, hold cap between the little finger and the palm of your left hand. Pay attention not to spill the contents of the pack
- Flame mouth of the flask
- Carefully pour the wort from the pack into the flask. The two should never touch
- Flame the mouth of the flask, put cap back in place
Now you have a culture tube inoculated with fresh yeast. Incubate it in a warm (>27 °C) dry clean place. Expect signs of fermentation within 12 hours. Crack the cap open to release CO2, then proceed with plating for selection and storage.
You also have a flask with 300 ml of starter. This also should show signs of fermentation within a few hours. As soon as it's fermenting, step it up to a larger flask containing 700 ml of sterile wort.
Final step
First you have to prepare a 1000 ml flask containing 600 ml of sterile wort.
To do this, follow the now familiar wort to flask sterile transfer technique.
Then transfer the contents of the 500 ml flask to the 1000 ml flask using liquid to liquid sterile transfer.
When this last step is actively fermenting, you are ready to pitch into your wort.
If you are worried about introducing a large quantity of starter wort in your batch, you can allow the last step to ferment almost out, discard most of the liquid portion, and add fresh wort after the boil and chilling. By the time you have racked to primary, removed trub, aerated, etc. you should be ready to pitch.
For a lager or a very high gravity beer, the common procedure is to double the last step: after you have 300 ml of starter, transfer it in 2 flasks with 700 ml of sterile wort each. This won't require any extra time, only more wort and another flask, but you will end up with twice as much yeast to pitch.
Using too little yeast (under-pitching) will result in a diaceytl flavor (butterscotch) in your finished beer as well as high finishing gravities. While far less common, over-pitching (too much yeast) can also result in off flavors as the yeast will run out of sugar before it completes a full fermentation cycle.
Some time back I had Chris White from White Labs as a guest on the BeerSmith podcast, and read his excellent book Yeast: The Practical Guide to Beer Fermentation (Brewing Elements Series)(Amazon Aff Link). I also did quite a bit of research while developing a yeast starter tool for the next version of BeerSmith. In both cases, I learned a lot about yeast starters and how to properly calculate and size them. I thought I might share this knowledge with you.
The Pitching Rate - How Much Yeast Do I Need?The amount of yeast you need (called the pitching rate) varies depending on the type of yeast you are using. Most sources quote 1 million yeast cells per milliliter per degree plato for an average beer. A more accurate figure from Dave Miller is 0.75 million/ml-P for ales, 1.5 million/ml-P for lager and 1.0 milion/ml-P for hybrid yeasts. To calculate the number of yeast cells you need overall, you simply multiply the pitching rate by the volume of the beer (in ml) and gravity of the beer (in plato) to get the number of live cells you need to pitch.
So for a sample ale of 5.25 gallons and 1.048 gravity - the number (if you do the math converting to ml and plato) is 177 billion cells. So if you pitch a starter with 177 billion cells, you will have a proper amount of yeast for fermenting the beer.
Liquid and Dry Yeast Pack Size
The two primary liquid yeast providers in the US are White labs and Wyeast. White labs yeast comes in vials that contain from 80-120 billion cells each, with an average of about 100 billion cells for a fresh vial. Wyeast labs come in large and small smack packs. The large pack is comparable to the vials, with about 100 billion cells per smack pack. The small smack pack has considerably less - about 18-20 billion cells per pack.
Since even the 100 billion packs/vials are less than the 177 billion cells we calculated for a moderate ale, this means that most 5 gallon batches would benefit from a starter.
Dry yeast packets (Danstar, DCL SafeAle and others), which are considerably denser, contain about 18 billion yeast cells per gram. Dry yeast packets come in small and large packet sizes of 5 grams and 11.5 grams. Running the numbers, the 5 gram packet contains about 90 billion yeast cells and the 11.5 gram packet contains 207 billion yeast cells.
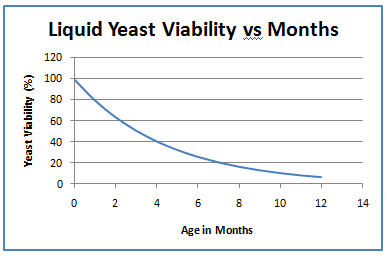
ViabilityThe figures above are for fresh liquid or dry yeast packets. Unfortunately both dry and liquid yeast cells do die off as they are stored, making older yeast less effective. The percentage of live yeast in a sample is called its viability - a brand new packet is 100% viable, but loses viability over time. The effect is much more pronounced for liquid yeast than dry yeast.
Dry yeast has a long shelf life. If stored at room temperature it loses only about 20% of its viability per year (<2% per month), and if refrigerated it only loses 4% per year. So if you refrigerate your dry yeast it will last many years.
Liquid yeast, which must be refrigerated, has a much shorter shelf life. Wyeast lists their shelf life at 5-6 months while White labs recommends 4 months. White labs on their web site says that after 30 days, their vials have 75-85% viability, which is a loss of about 20% of viability in the first month. If we compound this loss (20% per month), this means that the viability of liquid yeast follows this progression:
- 1 month - 80% viable
- 2 months - 64% viable
- 3 months - 51% viable
- 4 months - 41% viable
- 5 months - 33% viable
- 6 months - 26% viable
Now even at 6 months, with 26% viability you can make a suitable starter, but you need to take into account the viability of liquid yeast when calculating the starter size.
Dry YeastDry yeast does not by itself need a starter, as long as you pitch enough packets of yeast. Generally all that is needed is that you hydrate the yeast with warm water for about 20 minutes before pitching. Use lukewarm water at 105F (41C) in the amount of 10 ml per gram of yeast. This works out to 50 ml (1.7 oz) of water per 5 gram packet or 115 ml (3.9 oz) per large dry packet.
If you are using dry yeast as the seed for a starter to step up for a larger starter, hydrate it as usual and then add the yeast to the starter. As above, the 5 gram packet contains about 90 billion yeast cells and the 11.5 gram packet contains 207 billion yeast cells. Age is seldom a significant factor unless the yeast is over a year old or has not been stored properly.
Liquid YeastLiquid yeast, due to both the cell count and viability lost as it ages, often does require a starter. To figure out how large the starter needs to be, you first want to calculate the number of packets needed. Generally the way to start is by calculating how many viable yeast cells you have in your vials or packets. This is done by multiplying the starting yeast cells for a packet by the viability (use the table above). So if you have a White labs vial that was manufactured 2 months ago, you will have 100 billion x 64% which is 64 billion cells per vial.
Next calculate the growth in cells needed. The beer in the earlier example (5.25 gallons of ale wort at 1.048) requires 177 billion cells. If we were to use 1 vial of 2 month old ale yeast at 64 billion cells, we would calculate the growth at 177 billion divided by 64 billion = 2.77 -- meaning that we need to expand the yeast 2.77 times to get to our target population.
This means our starter needs to grow 2.77 times, from about 64 billion cells to about 177 billion cells in order to create the proper pitching rate for our finished beer. The next step is to figure out how large a starter we need to create to achieve this growth. One might think this is a straightforward calculation, but it turns out that the growth of yeast is not linear - it depends on how many yeast cells you have to start with.
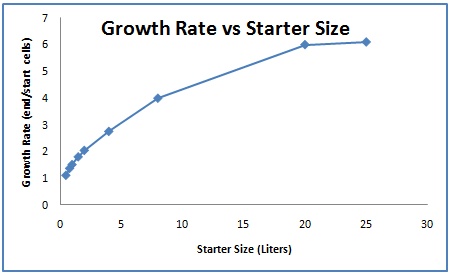
The graph to the right, extracted from a table in Chris White's yeast book, shows the growth rate from an experiment with a 100 billion cell vial of yeast added to starters of varying size. Obviously if you start with a very small starter, and a lot of yeast there is not much sugar to support growth and the growth rate remains low. At the other end of the spectrum, if you pitch a relatively small amount of yeast into a large starter (approaching 20 liters) you get high growth.
However, growth rate peaks out at around 6.0, so pitching 100 billion cells is not going to get you much more than 600 billion cells total (6x growth rate), no matter how large the starter is.
Thank you again for your continued support!
Brad Smith BeerSmith.com Follow BeerSmith on Twitter and Facebook